During Andrew's visit, all of the shipped pieces were checked to make sure there were no faulty manufacturing issues, and that all were accounted for. Then the assembly began. One of the first pieces to be put together were the mini keels on the bottom of the hulls, which makes perfect sense, if you think of building from the bottom up!

Here the plug for the mini keel was first ground and sanded smooth, as shown on the right hull. The mini keel shell was then carefully fitted over top of it, with the edges carefully trimmed, and fiberglassed into place. We see the completed assembly on the left hull.
Once these dried, the hulls were then flipped over and lifted into the jig, to become the first part of our boat. Here, Andrew watches anxiously as the first hull is lowered into place.

Next, looking from the front of the vessel-to-be, we can see the large champfer panels fitted on each side and the bridgedeck that joins them in place across the front. The seams were sanded and epoxied into place with small wooden tabs (squares) holding the seam together, sort of like band aids, until it completely dried.
Going around to the rear of the boat, we can see a similar process with the two sugar scoops and the stern bulkhead forming the stern of the boat.
.jpg)
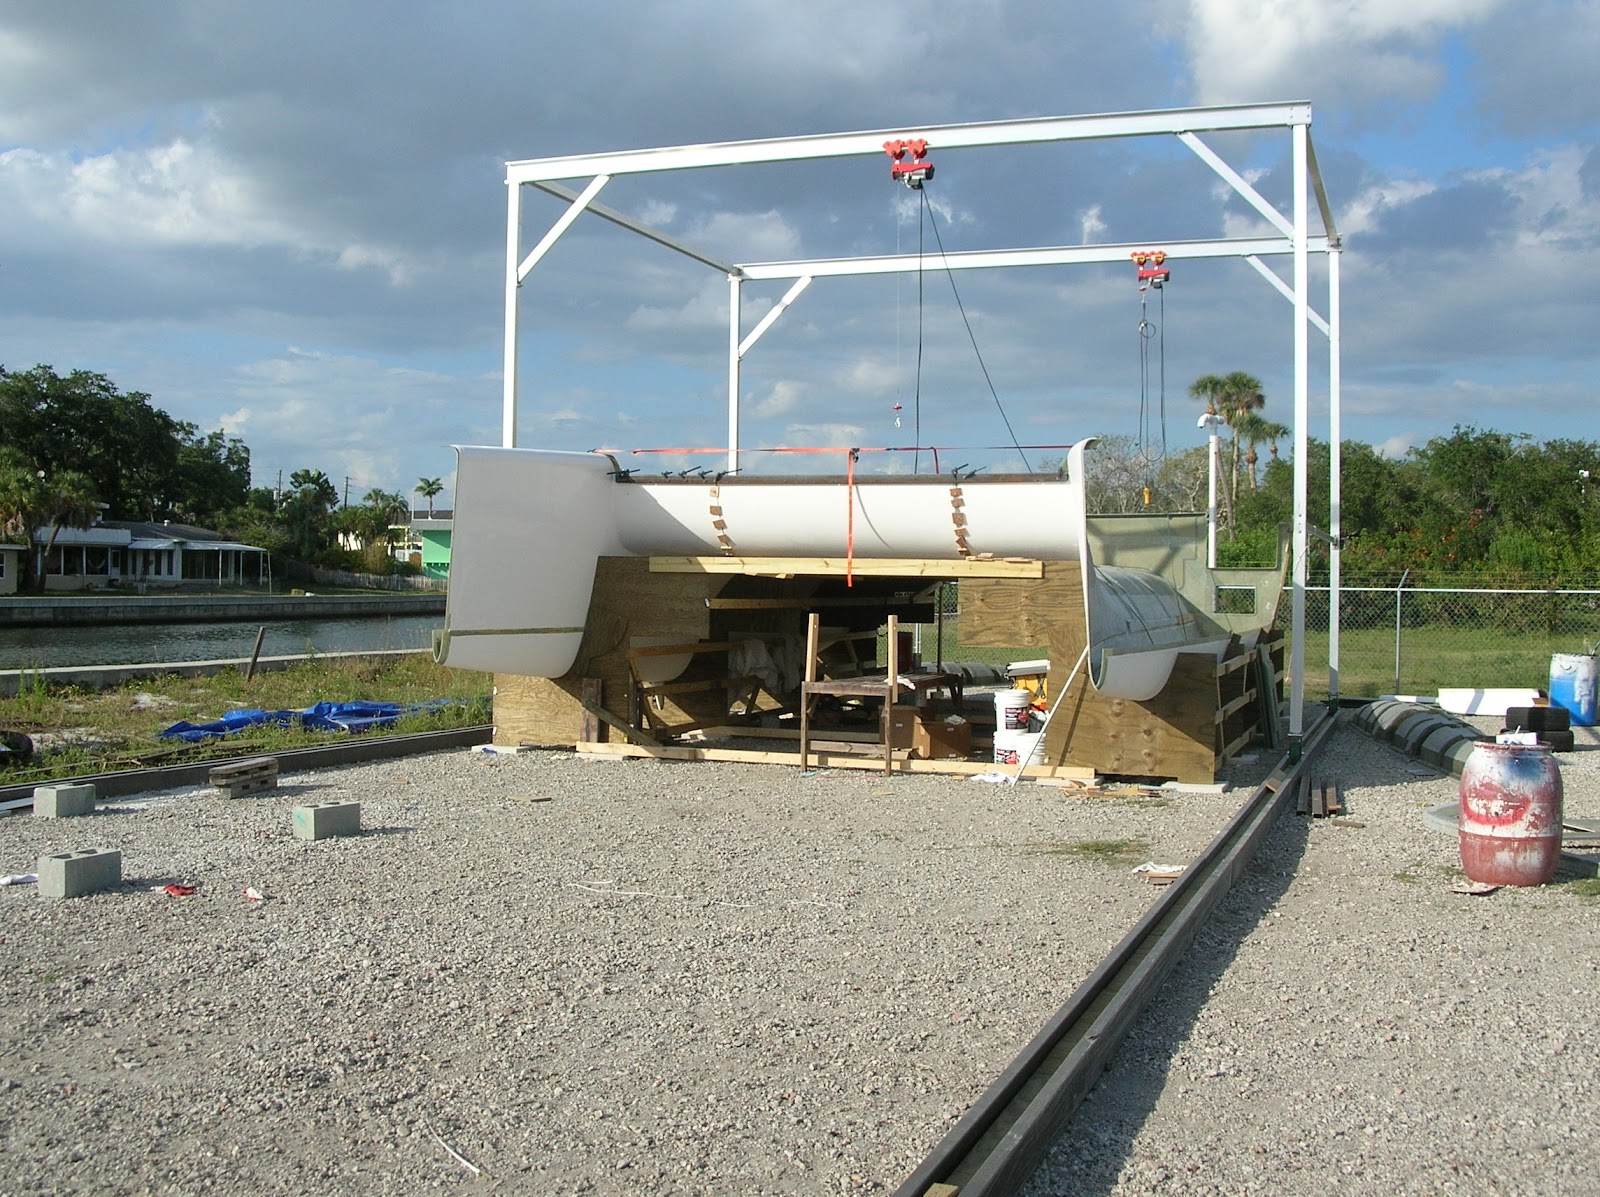
Fitting more of the major pieces into place, we can now see almost a complete skeleton, and I am already imagining stepping out the door from the salon to the cockpit, holding an umbrella drink!
.jpg)
Next the crew moved to the underside of the front and back, fitting the bulkheads that will support the stairs, cockpit, and salon entrance:

These steps, while they look very impressive, are really just all about initial fitting and measuring. We watched this progression excitedly via our remote camera, and then one day, the skeleton was dismantled and it appeared as if we were back to square one! But once the rough fitting had been completed, each piece had to be separately, carefully ground and sanded, with the edges trimmed to fit together exactly, and then glued into place.

Each seam of every piece is glued, and then a special unidirectional fiberglass mat is epoxied in several overlapping layers on the seams to strengthen them. The layers start large and then get smaller with each subsequent covering, for maximum strength and bonding. This special mat is something that is not commonly used here in the US, and had to be ordered specially, but it's use was highly recommended by Fusion.

The team worked together in a well-rehearsed rhythm; above Jake pays close attention to the mix of resin and hardener in the glue, before handing it off to Paul, who was doing the application. This is a sensitive job, because too much hardener will cause the glue will dry before it's smoothed into place, and not enough means it will not dry properly. It's also a really messy job, and by the end of the day, everyone was itchy because of the fiberglass.

Here you can see the tedious process of sanding each individual piece to fit the ones next to it, and trimming the edges so it's completely ready for the bonding process. This is where the team's attention to detail and their patience in getting each edge just right will pay off with a beautiful product in the end-strong and well-fit. I think of my efforts at painting or wallpapering, which I love the end result of, but the endless hours of preparation needed drive me crazy!!

Here you can see the rear beam (one half is an exterior finish and the other is unfinished, an interior part), ready for bonding and glassing. It's a lot like playing with giant Legos or a jigsaw puzzle, but these preparation steps are really what separate the amateurs from the professionals, and it makes a world of difference in the quality of the vessel in the end.

Here we see up close the (messy!) process of epoxying the fiberglass into place, as additional drainpipes are glued onto the engine hatches, to improve drainage from these compartments. This step is one of several that were not "in the build book", but were recommended by Andrew as a design improvement over the original build documents. This was not the only time we were glad we bought kit # 71 and not kit # 2, since over time, Fusion has improved on the initial concept in several areas.

This important piece is the compression bulkhead that will support the full weight of the mast. A fitted piece of (very heavy) mahogany on either side of the joint, will reinforce and spread the full weight load of the mast.

This is the only piece of real wood in the whole structure, and when Lari first spotted it, she thought she was getting a beautiful mahogany tabletop!

Once the gorgeous wood is sealed and glassed over, it's hard to tell it's even there, but it will be silently supporting us as we take the boat to sea.
After only three weeks, the team is able to triumphantly announce, "The first container is empty!" Only one more to go :)
Our team has worked very hard to get to this point-Thanks for a job being very well done!
 |
| Jake, Paul, Rian, and Andrew! |
Look for more progress in our next posts, as the exterior gets completed, and we move to the interior stages. In the meantime, enjoy the summertime!
No comments:
Post a Comment